In my last two posts, I promoted the idea of using tiling (tessellation) as an interesting context in geometry class, especially for the introduction of some basic ideas of transformational geometry. One reason this works is the connection with art, including the abstract patterns in Islamic art and the mind-bending creations of M.C. Escher. John Golden is a connoisseur of math-art and an expert user of GeoGebra. I asked him to share his approach to using software to “Escherize” tessellations.
— Henri
Escherized Tessellations in GeoGebra
by John Golden
I was really honored to be asked to write for Henri’s site, which is really the most comprehensive site any one person has made to support math teachers, while also being of utmost quality.
In Robert Fathauer’s exhaustive new text Tessellations: Mathematics, Art and Recreation, he introduces Koloman Moser as possibly the first to make tessellations that looked like real-life objects.

Moser was interested in all sorts of repeating motifs. Dover has a great-looking collection of his designs. But certainly it was M. C. Escher’s work that caught the world’s imagination, and makes a great hook for a mathematics lesson.
This post will guide the reader through using GeoGebra, a free dynamic algebra and geometry program, to make a customizable tiling. Starting out with a plain square in a checkerboard tiling, we will make changes to the edges, using our understanding of transformations to make sure the changed shape will still tile the plane.
The first step is picking a starting tile that tessellates the plane (for example, a square or regular hexagon, any triangle or quadrilateral.) Once that decision is made, the next step is figuring out which motions you will use to take one tile to another. As we make a customizable tile, the same transformations will be involved in both making the tile and in replicating it to fill the plane. We’re especially interested in the motions that could take the original shape onto a replica that shares an edge with it. For example, any triangle tessellates with rotations around the midpoints of its sides. I will show you how to make a square-based tiling, but you may preview my strategy by watching this video based on a triangle tiling.
Let us consider some of the many possibilities with squares. We could use midpoint rotations like I did for the triangle, but there are many other options. We could just translate the square to each neighbor, as illustrated in this diagram. (Numbering or labeling the sides of the tile helps track of the motions.)

What would would happen with a translation in one direction (say horizontally) and a glide reflection in the other (vertically)?

If we glide-reflect down from the rightmost square, would it match the translation right from the bottom square? Yes! Escher used this pattern a lot, as in this example from the Escher estate website.

Not all combinations work! What if we tried to mix rotations? Let’s try starting with a corner rotation and a midpoint rotation. If sides 1 & 2 are connected and side 3 goes to itself, side 4 will have to go to itself. But the bottom right shows that we get a mismatch if we keep going.

Surprisingly, we can mix a glide reflection with two midpoint rotations:

Here is an Escher creation using this pattern:

Below we see that we could rotate 90° around two opposing corners, taking side 2 to side 1 (and vice versa) and side 3 to side 4. The corner rotations take our starting center square E to B, B to C, C to F. Likewise, C to D to G to H. But what happens at A or I? The numbering helps us see that the rotation on the top right corner pairs up sides 1 & 2, and the other rotation pairs sides 3 & 4. So in square I, in red, we can pair side 2 with side 1 in H, and side 3 with side 4 in F. This is consistent, because 2 & 3 are still in clockwise order, and we can fill in 1 and 4. It looks like a rotation of the center square by 180° around the vertex between E and I.

[Also note that in square I (as in the original square E) the intersection of sides 1 and 2 is the center of a clockwise rotation, and the intersection of sides 3 and 4 is the center of a counterclockwise rotation. The centers of rotation propagate. — HP]
Let’s make this two-corner rotation tiling in GeoGebra. Once you have chosen the tile and the motions, it is time to open the application. You can use the online calculator or the desktop version in your own computer. Both versions have all the power you need. Here I’ll use the online version because everyone has access to that immediately.
Launch the GeoGebra online calculator. On the left side of the screen you’ll see three tabs:
![]()
One is the Algebra view where you can enter equations. It also serves as a list of everything you make. The middle tab has the Geometry tools, which is mostly what we will be using. (The third is a Table view for exploring functions. We will not need it.) From the settings, a gear at the top right, you can turn off the Show Axes option. From the Algebra Settings option (looks like a graph) you can make Auxiliary Objects visible on the list. That will be helpful when we hide and show items.

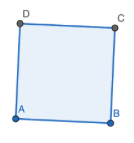
Choose the Geometry tab, and click More at the bottom of the tools. Make a square using the Regular Polygon tool.
We just need the square’s corners, but the polygon helps us visualize what is going on.

I’m going to imagine the rotations from side BC to AB (90° counterclockwise around B) and AD to CD (90° clockwise around D).
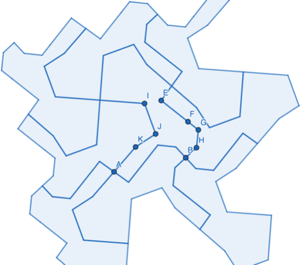
How many points do we want to be able to manipulate to change the shape? More points is more customizable, but also more complex and time consuming to make. I usually find 3 or 4 allows for pretty dramatic changes to the tile. We’ll make 3 on one side and 4 on the other. We’ll start with 4 along side BC, using the Point tool.

Once you make the points, select the Rotate around Point tool. We’ll rotate E, F, G, and H, 90° counterclockwise around B.

Now make 3 new points along side AD, and rotate them clockwise around D.

Once you have all the needed points, use the Polygon tool to make your tile. You click on all the points in the order you want, then click on the first point to close the polygon.

We could right now rotate the new polygon to see the fit, but it will be messy with a lot of points. So we’ll hide everything except the polygon (poly2) and points B and D, the points around which we will rotate. One way to do it is to switch to the Algebra tab and unselect all the stuff you want to hide:

Now use the Rotate around Point tool and rotate the polygon 90° counterclockwise around B. Then rotate the image and its image the same way. Repeat with the clockwise rotations around D. You should have an image like this one, where you can see some exciting fits. But what about the NE and SW corners?

If you show points A and C, you can rotate the original polygon 180° around them to complete the image.
[Another approach is to take advantage of the fact that the images of B and D are visible. If you use those (and their images, etc.) as centers of rotation, you can keep going and expand your tiling in all directions for as long as you want. —HP]
Go back to the Algebra tab and show the points that control the tile, (A, B for the square; E, F, G, H for the one side; I, J, K for the other).

Now you can really start to experiment! Be bold and use your imagination. What can you see?

Here is the applet of the finished tessellation with which you can play. But hopefully you have made your own! Any tiling that involves translations, rotations, and glide reflections can be the start of something a project like this one. (Tilings that involve reflections require other strategies.) Here is a video of making a glide reflection tessellation (applet here) in desktop GeoGebra.
One of the reasons I love making these in GeoGebra is the emphasis on using the same transformations to make the tile and to make the tessellation. Another is that by making them in a dynamic geometry environment, the transformations come to life as you can start to see the motion itself as a mathematical object: as you adjust points and change the tile, the motion remains the same. The challenge of making a dynamic tessellation is a good one to address using software, but it is also a good context for learning how to use GeoGebra, which equips the learner to use this tool for problem solving in other contexts. Pedagogically, making tessellations in the program seems to increase access for some learners as they follow steps in a forgiving environment with an undo button.
I welcome your questions or would love to see your pictures on Twitter (@mathhombre) or by email (goldenj@gvsu.edu).
Thank you John!
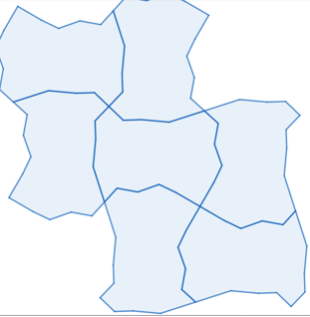
Here is the figure I made, following John’s instructions. I hid the rotation centers, and added color at the end.

Note that tiles that share the same color are translations of each other. This means that I could use the Sequence command to dramatically expand the tiling. I shared condensed instructions for that at the end of this post.
— Henri